What To Do If Your Infrared Sauna Brand Has Gone Into Liquidation

What To Do If Your Infrared Sauna Brand Has Gone Into Liquidation

What Happened to Found Space Saunas?

Many owners of Found Space infrared saunas have recently discovered that the company has gone into liquidation, leaving customers without warranty support, spare parts, or technical assistance. If your Found Space sauna has stopped working or developed a fault, you may be wondering whether it can still be repaired.

Don’t worry there’s good news

How to Build Your Own Himalayan Salt Wall in a Sauna (With Brick Calculator)

A Himalayan salt wall is one of the most striking upgrades you can add to a sauna. When backlit, the natural salt bricks produce a warm amber glow that transforms the space into a relaxing wellness environment. Salt walls are commonly installed in infrared saunas, traditional saunas, spas, and wellness rooms, and they can be built with relatively simple materials.

In this guide, we'll walk through the basic principles of building a salt wall, including laying a foundation, lighting, how to calculate exactly how many bricks you’ll need, and most importantly how to lay the bricks

Himalayan salt walls are popular in sauna design because they combine visual warmth with natural materials. When illuminated from behind, each brick glows slightly differently, creating a unique textured appearance.

Common benefits include:

• A warm ambient glow that enhances relaxation
• A premium spa-style feature in your sauna
• A natural material that complements cedar interiors
• A striking visual focal point behind benches or backrests

Salt walls work particularly well in infrared saunas, where the environment is warm but relatively dry.

Plan Your Salt Wall Location

The first step is deciding where the wall will go. Most salt walls are installed:

• Behind the backrest of the main bench
• As a full rear feature wall
• In a vertical column feature beside a heater

Make sure there is enough depth in the wall cavity to accommodate:

  • Salt brick thickness (50mm)

  • LED lighting space

  • Ventilation space behind the wall

A typical cavity depth of 70–100mm works well.

Build the Support Base

Salt bricks should not simply be stacked loose, or placed directly on the ground.

For installations at floor level, the salt wall should sit on a solid masonry base to provide stability and protection from moisture.

A common method is to construct a core-filled concrete block foundation, where standard concrete masonry blocks are laid, reinforced if required, and the cores filled with concrete to create a rigid and durable base. Before installing the salt bricks, apply a waterproof membrane or damp-proof course (DPC) across the top of the foundation to prevent rising moisture from being drawn into the salt.

Once the membrane is in place, the salt bricks can be installed on top of the prepared base using a suitable adhesive

Note:

Because Himalayan salt is hygroscopic and can absorb water, this waterproof layer is essential to prevent rising damp, which could otherwise cause the bricks to deteriorate over time.

Install LED Backlighting

Lighting is what makes a salt wall really shine.

Use low-Voltage LED strip lighting behind the bricks.

Best practices:

• Cool white –4000K LEDs (The bricks natural colour will diffuse the light)
• Even spacing across the wall
• Diffuse lighting if possible
• Leave ventilation space behind bricks

Avoid high heat lights. LED is essential for longevity and safety.

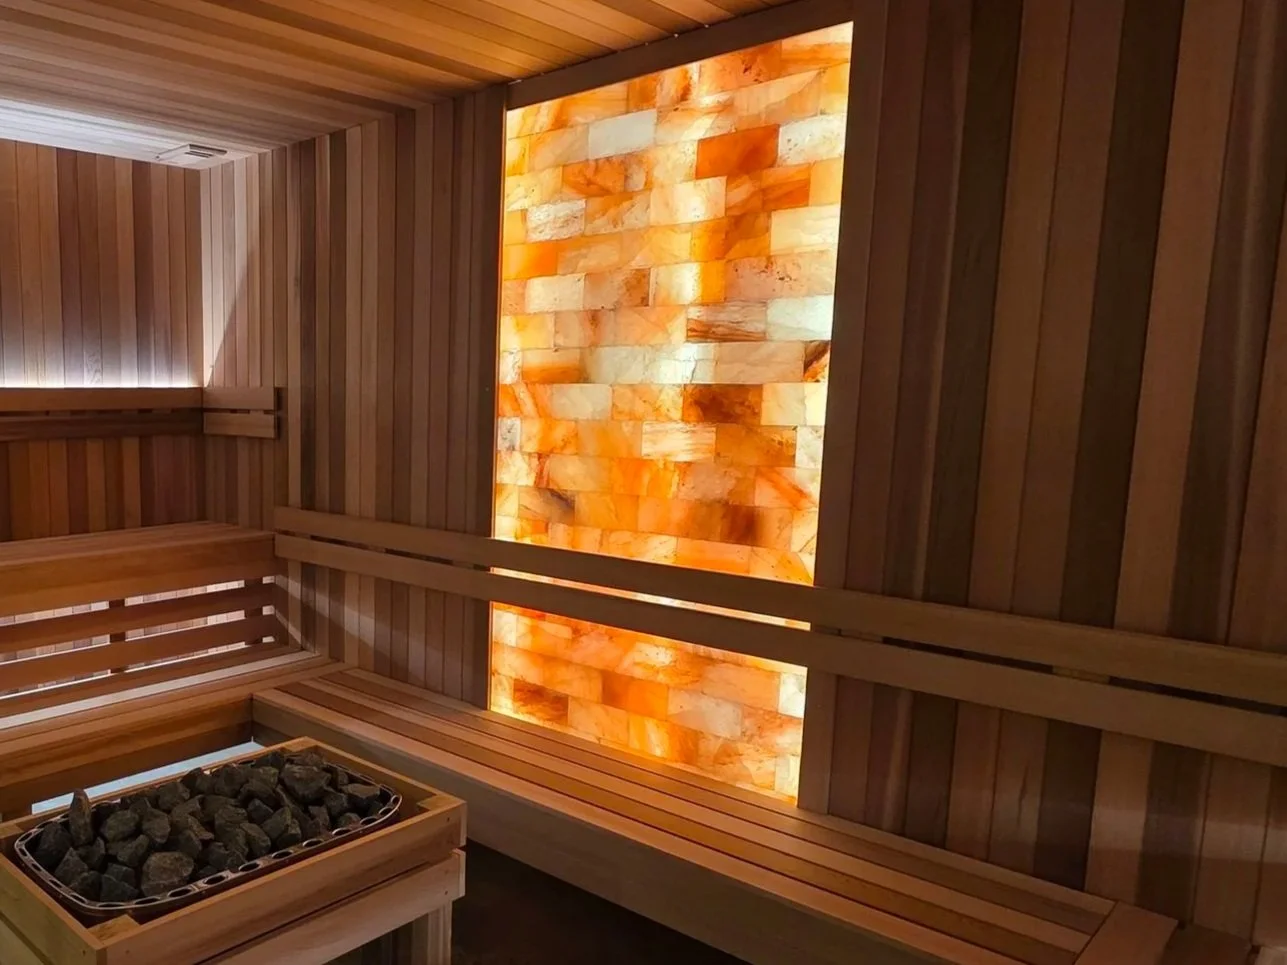
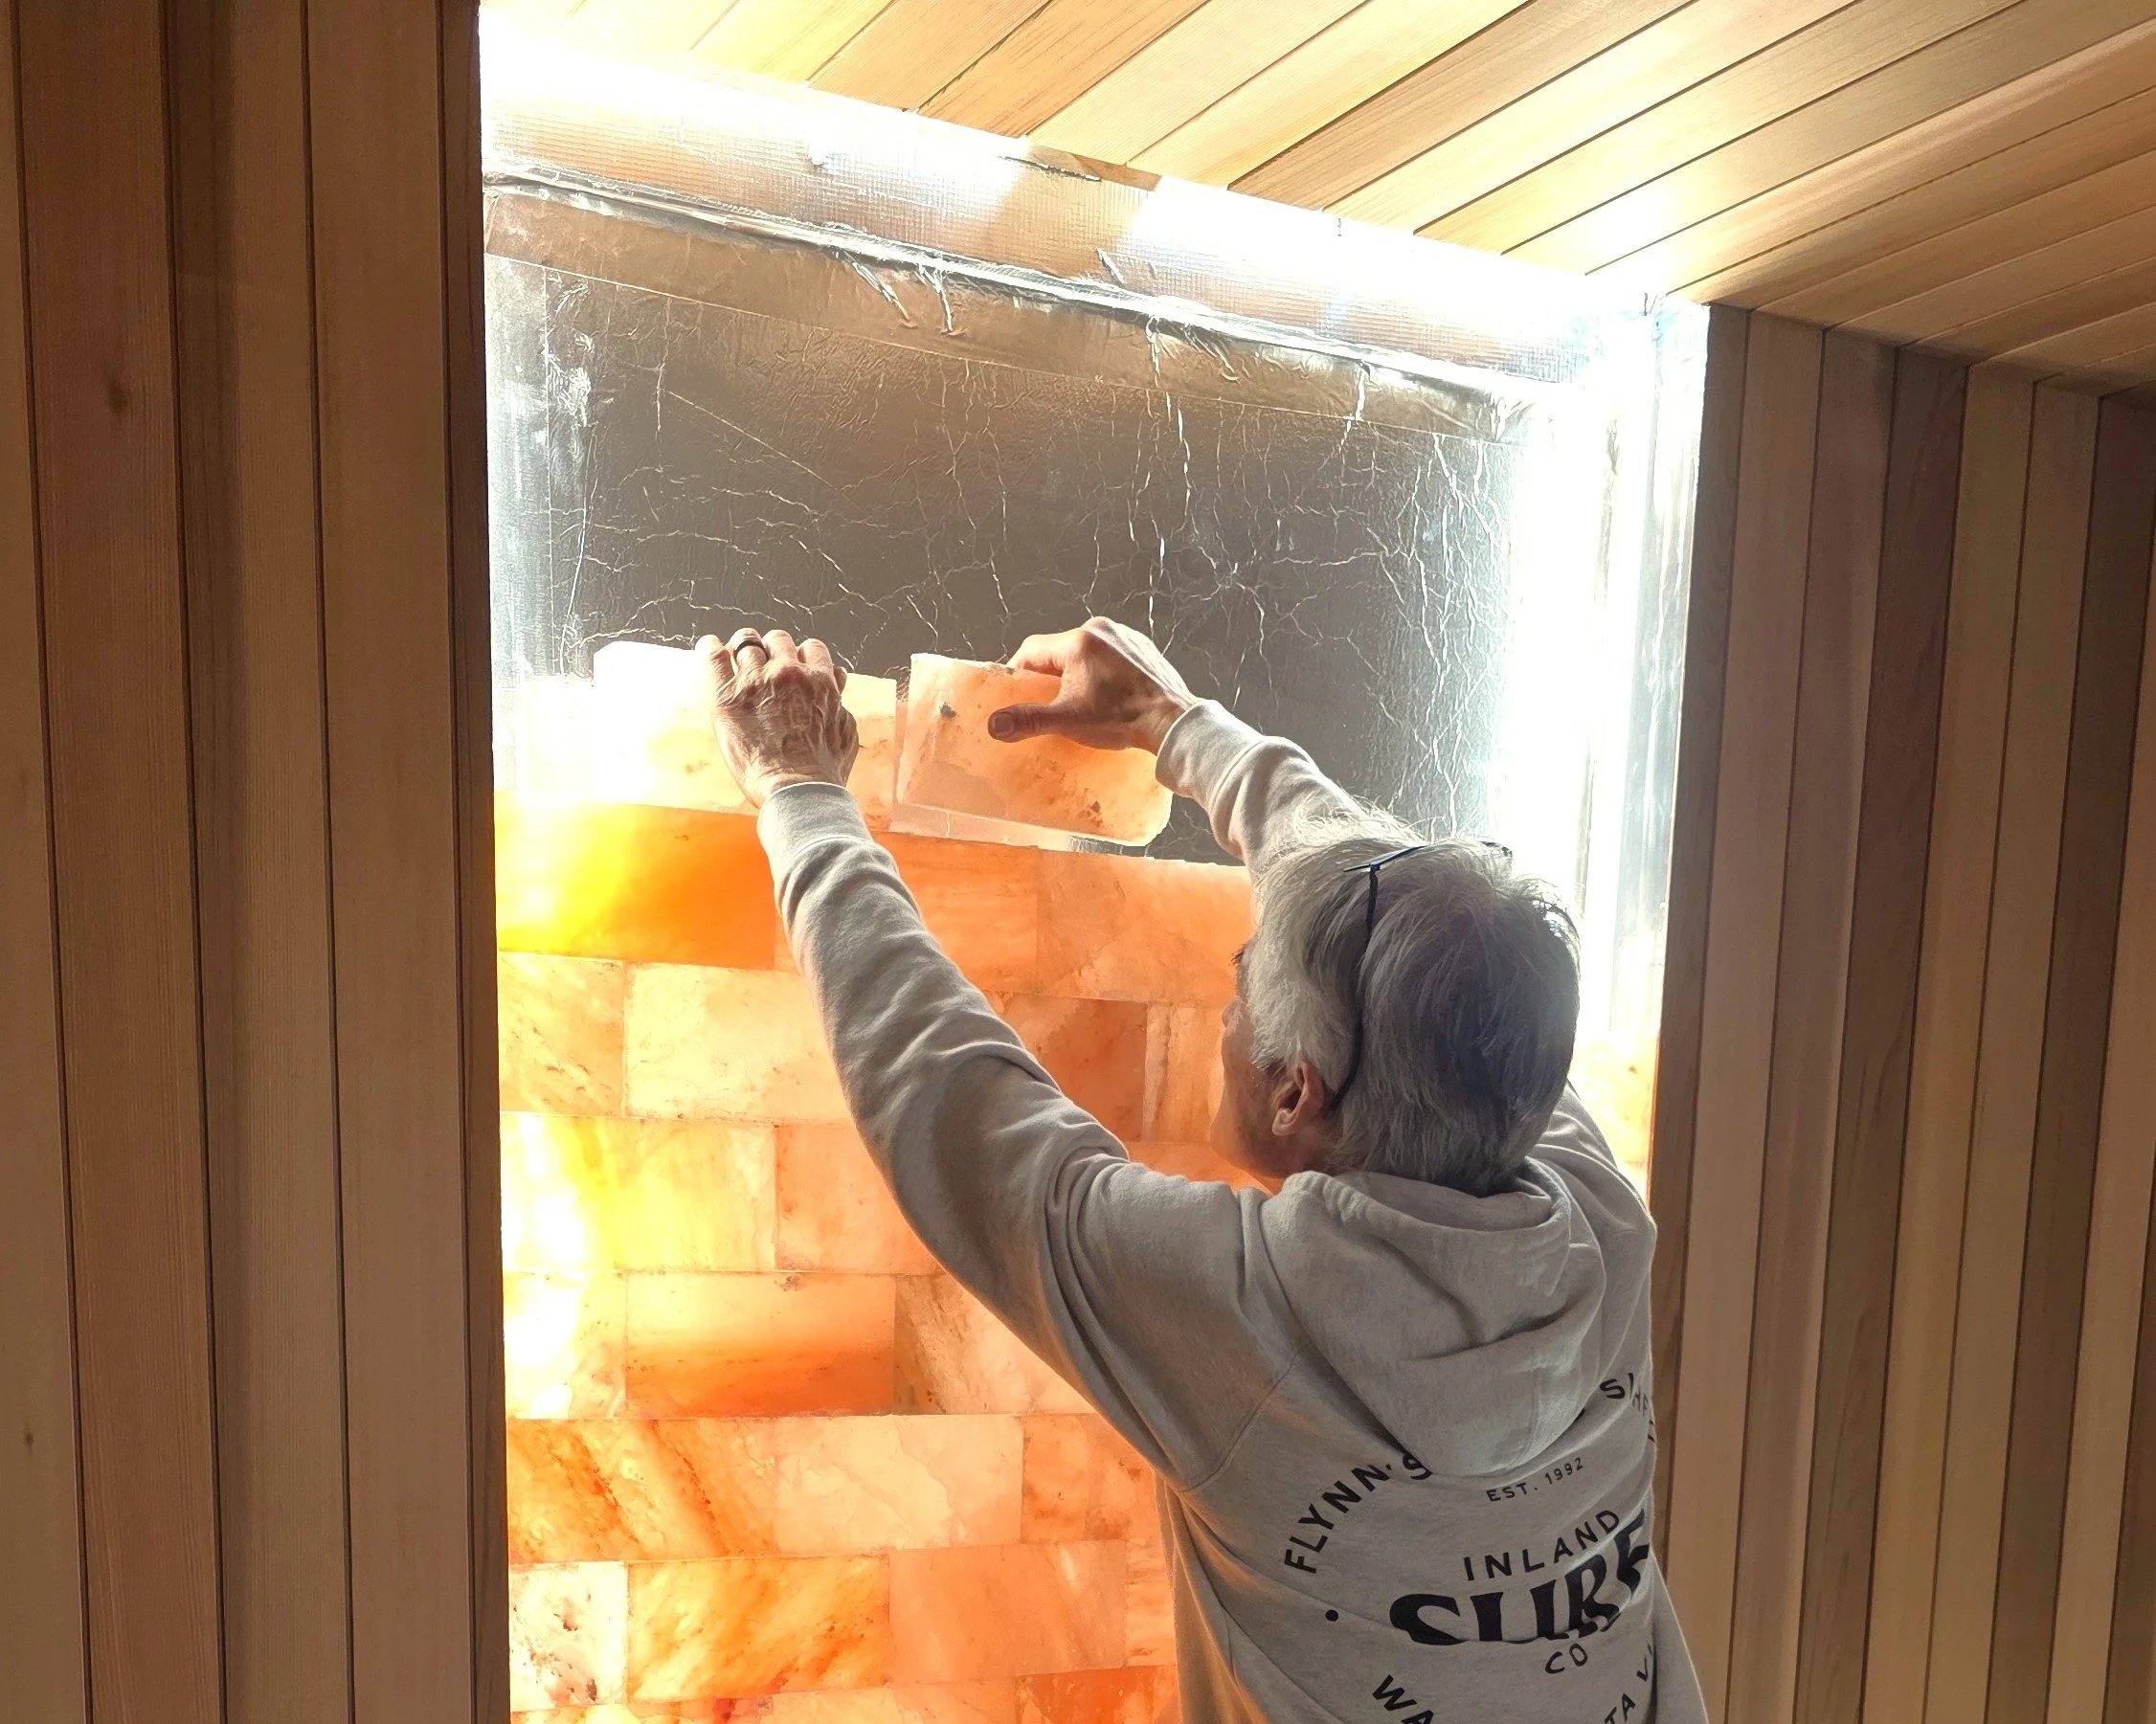
Installing the Salt Bricks

Salt bricks typically measure: 50 × 100 × 200mm

Salt bricks should be laid in an offset pattern, similar to a standard brick wall, where each course is staggered so the vertical joints do not line up. This improves the stability and visual appearance of the wall.

The bricks can be fixed using a specialised adhesive which is supplied in a standard caulking tube, applied in beads to the contact surfaces before positioning each brick. as a rule the adhesive should be applied to the entire length on the surface being adhered to, with two 3-5mm beads being sufficient

As the wall progresses, some bricks may need to be trimmed to fit edges or corners. Himalayan salt bricks are relatively soft and can be cut with a hand saw, brick saw, or angle grinder with a suitable masonry blade. When cutting, work carefully to avoid chipping and ensure accurate fits.

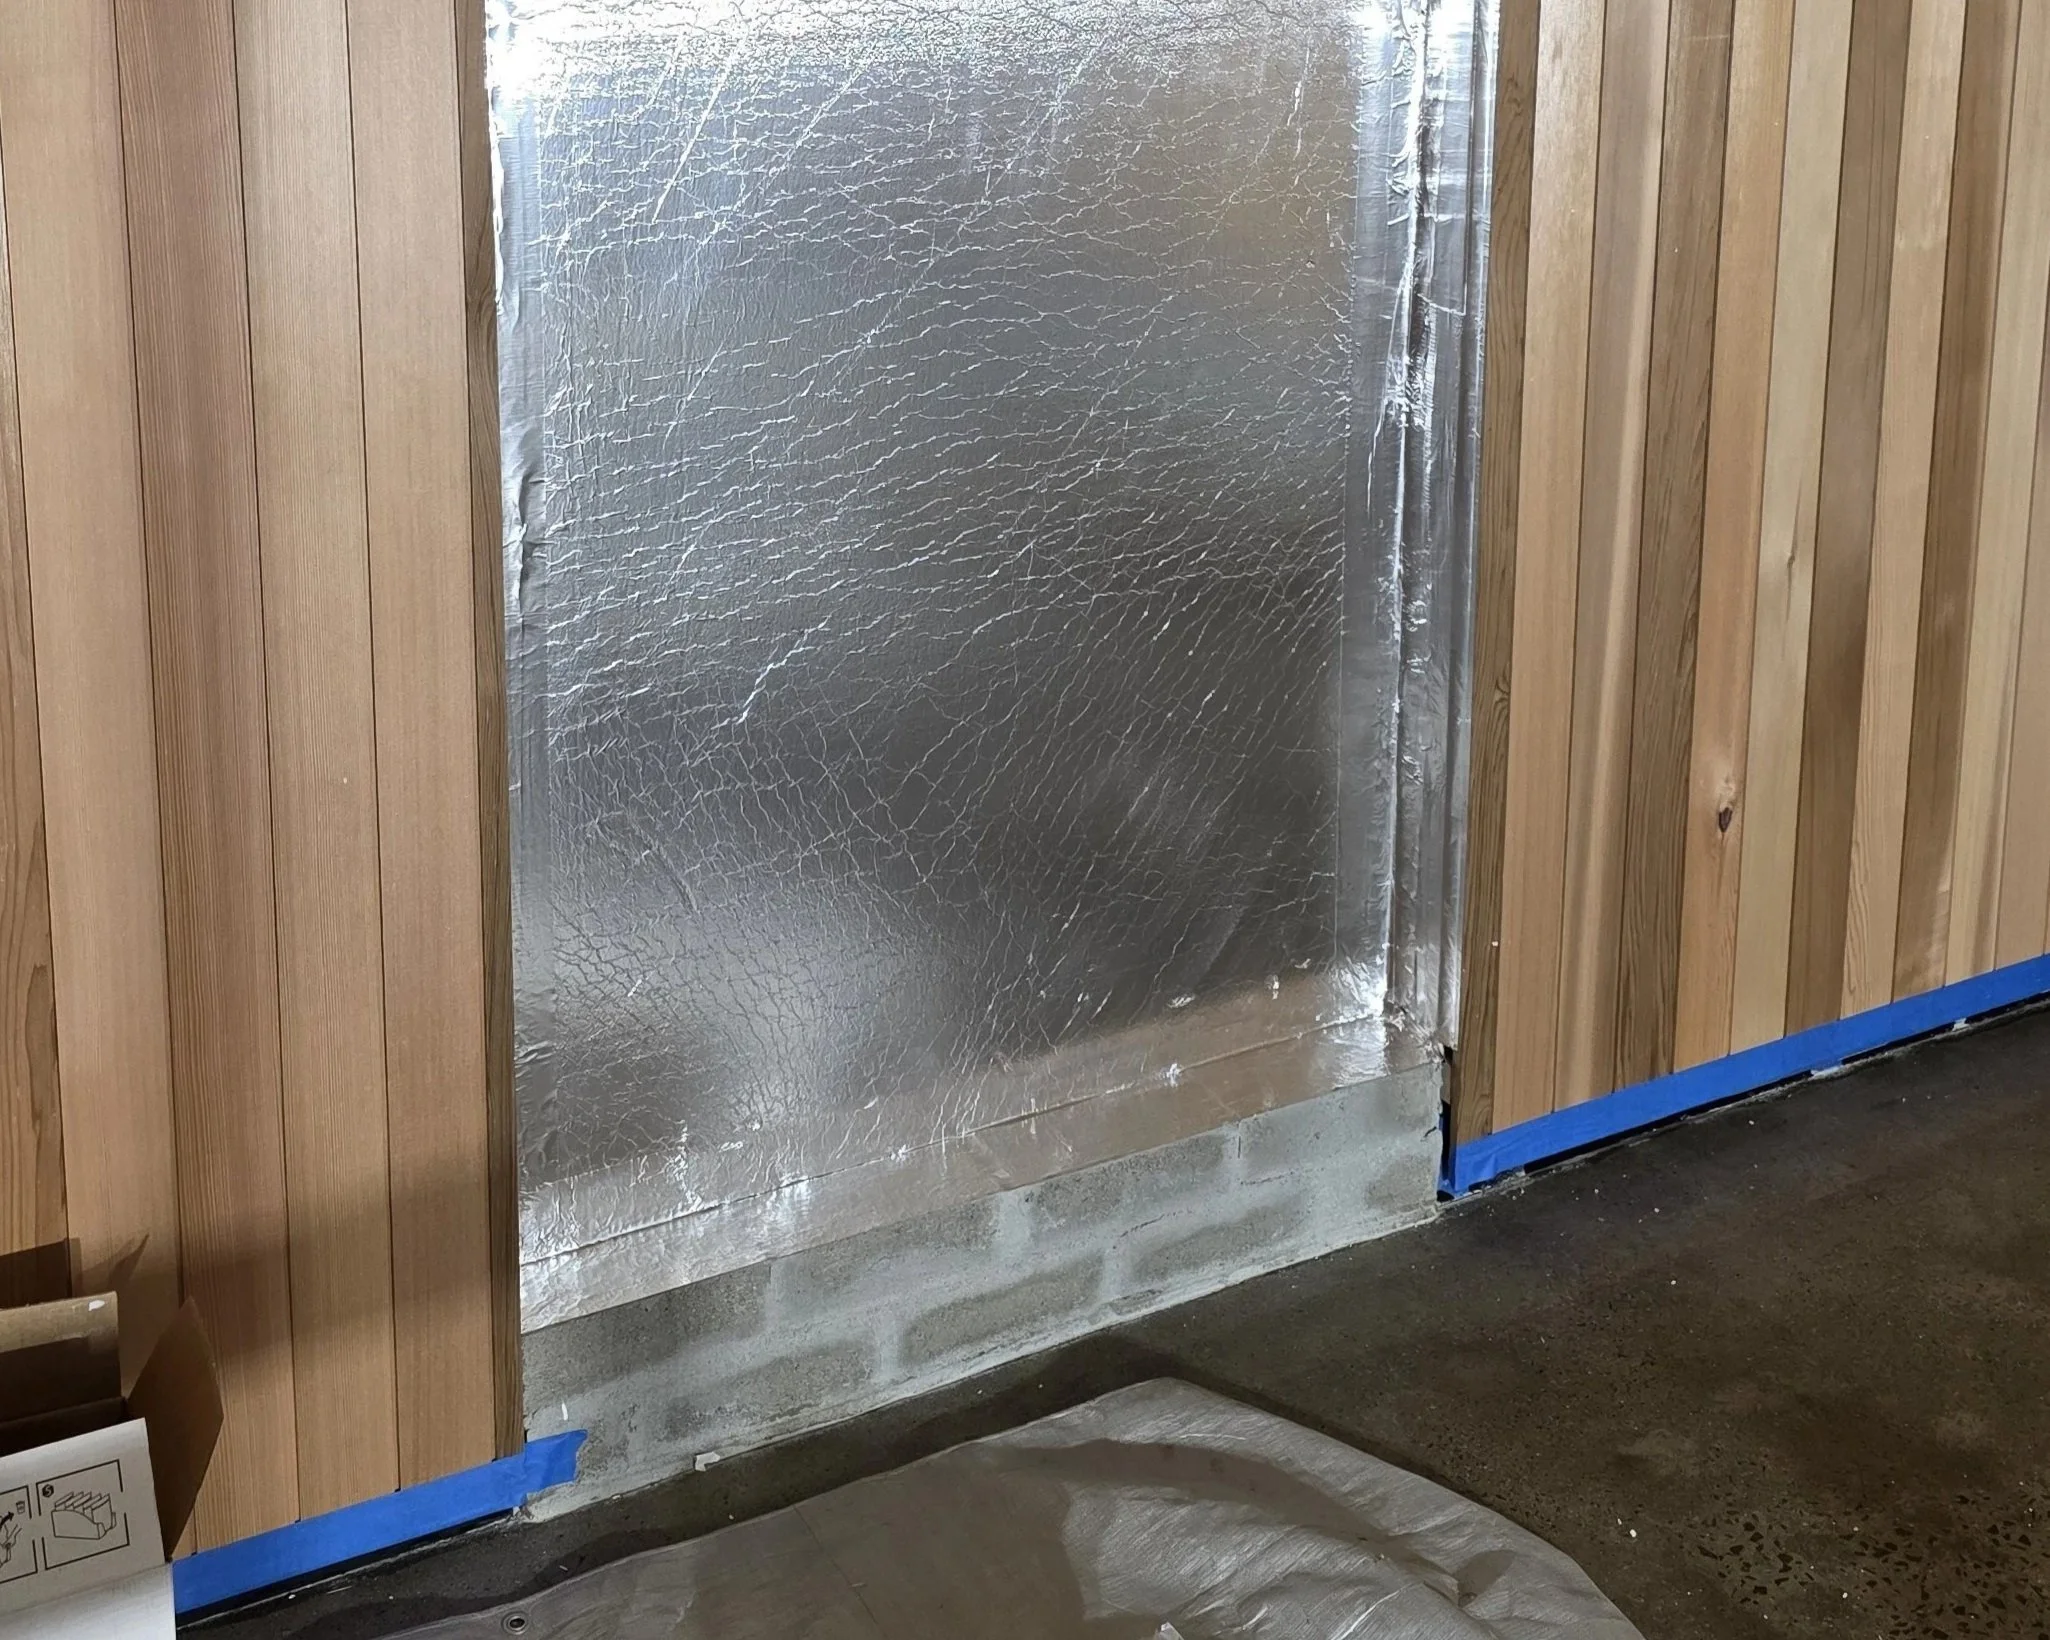
Include a clear PVC brick tie approximately every 5 courses, fixing it back to the supporting wall to help secure the salt brickwork and provide additional lateral stability while remaining visually unobtrusive

Once the salt bricks are installed, a perimeter trim can be fitted flush with the surrounding wall to neatly frame the installation and provide additional support to the outer edges of the brickwork. This trim can be made from a matching material such as cedar, chosen to complement the surrounding sauna interior

Once installation is complete, it is important to clean all tools thoroughly, as salt residue can attract moisture and is corrosive to metal surfaces if left on tools or equipment.

How to Calculate How Many Bricks You Need

This is the most common question when planning a salt wall.

Because each brick face is 20 cm × 10 cm, we can easily calculate coverage.

Area Covered by One Brick

20 cm × 10 cm = 200 cm²

Bricks Per Square Metre

1 square metre = 10,000 cm²

10,000 ÷ 200 = 50 bricks

50 bricks cover approximately 1 square metre

Quick Brick Calculator

Wall SizeBricks Needed1 m²50 bricks1.5 m²75 bricks2 m²100 bricks3 m²150 bricks4 m²200 bricks

Example Calculation

Wall size:

2000mm wide × 600mm high

Convert to metres:

2.0 × 0.6 = 1.2 m²

1.2 × 50 = 60 bricks required

Always order 5–10 extra bricks to allow for cutting or breakage.

Installation Tips for Sauna Environments

To get the best lifespan from your salt wall:

• Install in dry sauna environments
• Ensure ventilation behind the wall
• Use LED lighting only
• Avoid high steam exposure
• Protect bricks during installation (salt chips easily)

Final Thoughts

A Himalayan salt wall is one of the most beautiful upgrades you can add to a sauna. With simple framing, LED lighting, and the correct number of bricks, you can create a stunning feature that gives your sauna a true spa-quality finish.

If you need salt bricks, installation advice, or replacement sauna parts, the team at Infrared Sauna Repairs can help.

Custom Infrared Saunas for Melbourne Gyms

Here at Infrared Sauna Repairs in the past month or so, we have been lucky enough to construct two custom made Infrared Saunas in new gyms in Melbourne.

Working closely with the owner, we designed infrared saunas to perfectly compliment the new spaces and provide an innovative service for their gymnasium customers.

Built with the stunning Clear Western Red Cedar, the two custom infrared saunas were fitted out with internal and external wall controllers, stylish under-bench strip lighting, and reading lights. The glass door was cut to measure, including brushed chrome hardware and the heaters perfectly placed within the saunas to provide the gradual warming heat of the infrared sauna, which opens our pores and helps us sweat out toxins.

See below photos of the builds, and the beautiful results for our client. You might see one in a gym near you soon!

Be in touch to discuss design ideas for your custom made infrared sauna and let us guide you through the process to achieve the sauna of your dreams.

Allan Burns
Red Earth Saunas + Infrared Sauna Repairs, Melbourne, Australia
0499 826 814
service@customsaunas.com.au

Reference:

Fiorella, V 2017, 'OFF DUTY --- Style & Fashion: Heat Advisory --- The buzz about infrared sauna therapies is growing, thanks to claims of detox benefits and stress relief, but do these sessions truly deliver?', The Wall Street journal. Eastern edition, 2017.

Can Your Infrared Sauna Improve Your Eye Health?

Good eye health and clear vision are vital contributors to a person’s health and overall quality of life. Eye health is defined as maximised vision, ocular health and functional ability, contributing to overall health and wellbeing, social inclusion and quality of life (Lancet Global Health 2021, p 489).

A recent study by the University College London has found there is a significant benefit to eye health for those over 40 who look at a deep red light with a wavelength of 670 nanometers (nm) for just three minutes a day. The study found that using specific wavelengths for brief exposures enhanced the ability for over 40s to detect colours by up to 20%, particularly within the blue spectrum, which is the most susceptible to age-related decline (Lavars, N. New Atlas).

Looking at the red light also produced a significant improvement in the performance of the retina for those over 40. The retina is a crucial element of the eye that processes pictures from focused light, sending the information to the brain through the optic nerve. Unfortunately, the retina ages faster than other organs, and there is a significant decline in photoreceptor function through the retina with age (Shinhmar, H. The Journals of Gerontology, p49). This study provides clear evidence for improved aging visual function through red light therapy and is a fantastic result for those of us over 40.

This brings us to a key question for infrared sauna users – particularly those approaching or over 40yo - can your infrared sauna positively impact your eye health?

Unfortunately, infrared saunas can’t be used for red light eye therapy. Infrared saunas primarily use far infrared wavelengths ranging from 700nm-1400nm through heat lamps, while red light therapy use wavelengths ranging from 600-650nm and through cold LED or laser (Tsai S-R, 2017). There is a key difference between the two, with red light therapy using light to make a positive change to your body and infrared saunas using heat.

While both red light therapy and infrared saunas deliver therapeutic benefits, it is important not to mix their purposes. It must be noted that staring directly into infrared sauna’s red heaters for an extended period in the way the red light therapy was described, would not be safe for your eyes (Schroeder P et al. 2008). Instead, appropriate use of both infrared saunas and approved red light therapy could have you in fantastic health, particularly as you move beyond 40 years old.

REFERENCES

Burton, Matthew et al. The Lancet Global Health Commission on Global Eye Health: Vision beyond 2020, Lancet Global Health 2021; 9: e489–551 Published Online February 16, 2021 

Lavars, Nick, Deep red light reboots aging retinas like "recharging a battery", New Atlas, 29 June 2020, https://newatlas.com/medical/deep-red-light-aging-retinas/?itm_source=newatlas&itm_medium=article-body

Schroeder P et al. 2008. The role of near infrared radiation in photoaging of the skin. Exp Geron. 43(7):629-632.

Shinhmar, Harpreet et al, Optically Improved Mitochondrial Function Redeems Aged Human Visual Decline, The Journals of Gerontology: Series A, Volume 75, Issue 9, September 2020, Pages e49–e52

Tsai S-R, Hamblin MR. 2017. Biological effects and medical applications of infrared radiation. J Photochem Photobio; B: Biology. 170:197-207.

Update: Custom made Infrared Sauna with bush views

You may remember a while back we posted a work in progress snapshot of a beautiful custom made infrared sauna we were building on a customer’s existing deck with stunning bush views. We had the privilege of designing and creating the evolution of the space from a deck to a fully enclosed infrared sauna, as well as a hot yoga and meditation zone. Here is the post if you want to revisit the origins of the project, including shots of the original deck and as the job progressed.

We are excited to show you the finished product, which includes expansive panoramic windows to the north and west sides of the sauna, custom built with Western Red Cedar frames and 10mm laminated toughened glass provide the retention of heat and safety required. This custom made infrared sauna also includes retractable seats, allowing space for yoga and meditation on the beautiful flooring. You will see in the gallery below photos of the sauna with the seats in place as well as shots of the seating retracted, in position for yoga or meditation.

The external cladding fits to the rest of the house, with treated pine weather boards painted black. We centred the glass door to the master bedroom on a new wall, allowing for a seamless transition between spaces. The sauna includes two wall controllers for the Infrared Sauna Controller, and we extended the electrical supply at the location of the new controller. Being A-Grade Electricians, our work comes with a Certificate of Electrical Safety.

We’d love to hear from you and help you design and build the custom made infrared sauna of your dreams.

Allan Burns

Red Earth Saunas + Infrared Sauna Repairs, Melbourne, Australia

+61 0499 826 814

allan@customsaunas.com.au

Converting your traditional sauna to an infrared sauna

Here at Infrared Sauna Repairs we are experts at converting your traditional steam sauna into a state of the art, custom infrared sauna.

By working closely with you, we focus on re-designing your existing space to ensure the right wattage and positioning of both Far Carbon Heating Panels, and "full spectrum" Quartz Halogen Heaters to ensure you get the best out of your new infrared sauna.

We can modify your exisiting traditional sauna fit out and supplement it with our top quality Western Red Cedar to rework the timber frames and panels where needed, for your new infrared sauna. In the re-design phase we enjoy custom designing your infrared sauna to make the most of your space or sometimes even an amazing view. Check out this stunning view from an infrared sauna we designed and installed recently in the outer suburbs of Melbourne, custom designed with our client to take advantage of the bush scape surrounds.

Our A-Grade Electricians are highly experienced infrared sauna specialists. Clients often opt to add in bluetooth sound systems and LED mood lighting and love the results. See below in the gallery of photos, examples of two seperate conversions from traditional to infrared saunas we have done in Melbourne in the past few months.

Be in touch to re-design and convert your traditional sauna into the state of the art infrared sauna of your dreams.

Allan Burns

Red Earth Saunas + Infrared Sauna Repairs, Melbourne, Australia

+61 0499 826 814

allan@customsaunas.com.au

Mornington Sauna Update

You may remember an earlier post about our custom built infrared sauna in Mornington, Victoria. We are excited to give you an update on it - it is looking fantastic!

The client’s infrared sauna is part of a new home build, so was included in the plans and is coming up a treat!

As per our usual, the timber cladding and frames are top quality Western Red Cedar and also include:

  • Carbon heating panels throughout

  • Reading light

  • Under bench LEDs.

  • Quartz Halogen Full Spectrum heaters

  • Bluetooth audio

  • Two wall controllers

  • Interior and exterior light switches

These aren’t the very final photos - but show the stunning work so far. We hope you enjoy and as always, be in touch to discuss design ideas for your own custom made infrared sauna and let us guide you through the process to achieve the infrared sauna of your dreams.

Allan Burns

Red Earth Saunas + Infrared Sauna Repairs, Melbourne, Australia

+61 0499 826 814

allan@customsaunas.com.au

A New Custom Built Infrared Sauna in Warragul

The new custom built infrared sauna we have made in Warragul, Victoria has come up a beauty! Featuring our go-to timber, the top quality Western Red Cedar for all cladding, benches and frames, it has all been made to order by us in our Melbourne workshop.

As you will see in the photos below, we have installed ceiling recessed Quartz Halogen "Full Spectrum" Heaters along with multiple VantaWave Carbon Heating Panels in the walls. We have also installed a quality Infrared Sauna Controller complete with two portrait wall controllers, bluetooth audio, interior and exterior 230v light switches and RGB control. After working with our client to design the infrared sauna to make the most of the space they have, you will see how well it has come up in the gallery below.

Don’t hesitate to be in touch with any questions or to start the process of designing and creating the infrared sauna of your dreams.

Allan Burns

Red Earth Saunas + Infrared Sauna Repairs, Melbourne, Australia

0499 826 814

allan@customsaunas.com.au

Stunning Work in Progress: Custom Made Infrared Sauna with Bush Views

We have had the privilege of designing and building a show stopping infrared sauna, custom made on our client’s existing deck to take advantage of beautiful bush views in Selby, Victoria.

You will see in the gallery of photos below the evolution of the space from a deck to what is a (close to completion) fully enclosed infrared sauna, as well as a hot yoga and meditation zone. The expansive panoramic windows to the north and west sides of the sauna are the feature pieces, custom built with Western Red Cedar frames and 10mm laminated toughened glass to provide the retention of heat and safety required.

The internal timber cladding and bench timber is also top quality New Vertical Grain Western Red Cedar, and the external cladding fits to the rest of the house, treated pine weather boards painted black. We have centred the glass door to the master bedroom on a new wall, expertly created between the existing retained window and external wall.

We supplied two wall controllers for the Infrared Sauna Controller, and extended the electrical supply at the location of the new controller. Being A-Grade Electricians, our work comes with a Certificate of Electrical Safety.

While this is nearing completion, we couldn’t wait to share the progress and encourage you to be in touch to design and build the custom made infrared sauna of your dreams.

Allan Burns

Red Earth Saunas + Infrared Sauna Repairs, Melbourne, Australia

+61 0499 826 814

allan@customsaunas.com.au

Custom Built Infrared Sauna in Mornington - watch this space!

Red Earth Saunas are proud to be working on a beautiful new custom built infrared sauna in a home under construction in Mornington, Victoria.

We worked with the client to settle on a design for an infrared sauna 3070L x 1840W x 2420H made entirely of Western Red Cedar, and featuring:

  • Quartz Halogen Full Spectrum heaters

  • Bluetooth audio

  • Two wall controllers

  • Interior and exterior light switches

  • Carbon heating panels throughout

  • Reading light

  • Under bench LEDs.

We have sourced the quality materials and have been working this week on installing the sauna. See below some great shots of the ceiling and floor Western Red Cedar going in.

Watch this space for a fantastic finished product!

Be in touch to discuss design ideas for your custom made infrared sauna and let us guide you through the process to achieve the sauna of your dreams.

Allan Burns

Red Earth Saunas + Infrared Sauna Repairs, Melbourne, Australia

+61 0499 826 814

allan@customsaunas.com.au

Custom Built Infrared Sauna in leafy Eltham, Victoria

Built with the stunning Clear Western Red Cedar, this custom built, made to order infrared sauna has been newly constructed in a home in Eltham, Victoria.

This beautiful in home sauna measures 2400L x 1700W x 2100H and is fully equipped with:

  • Infrared Sauna Controller, complete with two portrait wall controllers, bluetooth audio, interior and exterior switches and RGB control.

  • Quartz Halogen Full Spectrum Heater

  • Carbon Heating Panels with fitted Western Red Cedar framing

Be in touch today to discuss design ideas for your custom infrared sauna and let us guide you smoothly through the process to achieve the sauna of your dreams

Allan Burns

Red Earth Saunas + Infrared Sauna Repairs, Melbourne, Australia

+61 0499 826 814

allan@customsaunas.com.au

20210914_173252.jpg
Beautiful Western Red Cedar Infrared sauna room including shower

Beautiful Western Red Cedar Infrared sauna room including shower

Why custom build your infrared sauna with us?

Custom-built infrared saunas are our speciality. We take great pride in building your infrared sauna to your exact specifications, making the best possible use of the space you have set aside in your home or business. You may wish to build your infrared sauna to make the most of a beautiful view or to fit within a compact space. Whatever your heart’s desire – we will work to make it happen!

Utilising Qualified A-grade electricians, Craftsman Carpenters and top-quality products, your infrared sauna will be customised to your exact requirements, this may include a range of luxury features like curved/reclining benches, removable benches (to double the space as a Hot Yoga room), mood enhancement lighting, the list goes on.

Be in touch today to discuss design ideas for your custom infrared sauna and let us guide you smoothly through the process to achieve the sauna of your dreams.

An outdoor custom built sauna, Philip Island Victoria in August 2021

An outdoor custom built sauna, Philip Island Victoria in August 2021

My Floatation Tank experience – from sceptic to convert in one day. Seriously.

As a first-time floater, I approached my floatation tank experience at Beyond Rest Moonee Ponds with a dash of mild scepticism. I wanted to be open to the experience, and to give it a real shot, plus we were just out of a lockdown in Melbourne and I was keen for some peace and quiet from the relentless noise of ‘remote learning’ and the special hell that is back-to-back online meetings.

I was met at the front counter by a woman who was calm and welcoming. And wow did she know her stuff – she gave me a fantastic run down on how to get the best out of my float, and tips on what to avoid ie. touching my face due to the Epsom Salt content of the water.  The floatation tank was spacious, clean, glowing and beautiful. There was so much space inside the tank my fears about potential claustrophobia were quietened, and I was really interested to try it.

You have a quick cool shower and hop in naked. Meditative music plays into the tank for the first 10 minutes of your float to help you start to relax, and a soft blue light is on for the first 5 minutes or so. It is a relief to know there is a button to press to switch the light on at any time, and you can open the tank and hop out whenever you want. Still, the pitch black and eventual quiet of the tank is quite confronting. The water is kept at 34.5° which I learned is the perfect temperature to be skin receptor neutral – meaning when you are still, you are much less aware of your body.

It is fair to say I spent the first 20 minutes doing exactly what the brochure flags as likely for your first float - ‘exploring the tank.’ I was basically bouncing off the walls of the tank with my fingertips, trying to stay calm, be still and become relaxed in the enveloping dark and quiet of the tank.

It felt like a good portion of the first half of the float was a battle with my mind. I was determined to give it a go but also struggling with the sensory deprivation. Where the normal stimulation of our visual and physical lives usually distracts me nicely from existential dread, I found myself questioning “Is this what it feels like to be dead?” I was conscious but couldn’t feel my body or see anything, just… zero gravity, zero anything… floating. Then I spent some time confirming to myself that I would absolutely not cope with being trapped in a mine in the dark with no way out, and then had to spend some time calming myself from that thought. The reality was I could turn on a light if needed and could get out at any time. I pulled it together and hung in there.

Almost out of nowhere, I really started relaxing into it, and at the end of the float my mind and body had stilled and I was completely, deeply… calm. It was a really different feeling. I finished up the session feeling relaxed and very proud of myself for pushing through the initial discomfort, and leaning in to the experience.  

Floating naturally raises your dopamine and endorphin levels, and that was certainly my experience. I felt good finishing the session but then truly fantastic later that day and for the couple of days afterwards, I was all aglow (in my mind anyway) even amidst immediately going back into lockdown the next day. It was like I was mostly unconcerned, still floating gently above it all.

So all that to say - I am a convert! Now come on and be done Melbourne lockdown #6097, I want to book in more sessions.  

My Floatation Tank (notice how I’ve claimed it) - Beyond Rest Moonee Ponds

Improve your heart health with Infrared Saunas

Not only are infrared saunas calming and relaxing for the body and mind, they are also proven to be good for your heart health (Cullen et al. 2020). Recent studies have connected the use of regular heat exposure therapies with a reduction in the risk of heart disease and fatal cardiovascular disease.

Scientists from a Finnish University tracked the health outcomes of 2,315 men over 20 years, finding that those who took saunas regularly had a dramatically lowered risk of sudden cardiac death and fatal coronary heart disease (Laukkanen et al. 2015).

 Finland is a country where there are 5.3 million people and 3.3 million saunas (Bosworth 2013), with 99% of their adult population taking a sauna at least once a week. Saunas are seen as an integral part of Finnish culture, and have been used in the region for pleasure and health for thousands of years (Bosworth 2013).

The passive heat of an infrared sauna can offer improvements in blood vessel health and a reduction in high blood pressure. Both of these health outcomes, resulting from long-term, regular heat therapy, is a significant contributor in the reduction of the risk of cardiovascular disease (Laukkanen et al. 2015).

Next time you have a restorative infrared sauna session, you can relax in the knowledge that the health benefits are more than skin deep, perhaps even having lifesaving effects on your heart.

Be in touch to see how we can support you in your infrared sauna journey towards improved heart health.

Infrared Sauna Repairs, Melbourne, Australia

+61 0499 826 814

allan@customsaunas.com.au

One of our custom made infrared saunas, in Melbourne, Australia.

One of our custom made infrared saunas, in Melbourne, Australia.

References

Bosworth, Mark 2013 ‘Why Finland loves saunas’, BBC News, accessed 8 July 2021, https://www.bbc.com/news/magazine-24328773

Cullen, T, Clarke, ND, Hill, M, Menzies, C, Pugh, CJA, Steward, CJ & Thake, CD 2020, 'The health benefits of passive heating and aerobic exercise: To what extent do the mechanisms overlap?', Journal of Applied Physiology, vol. 129, no. 6, 2020/12/01, pp. 1304-1309.

Laukkanen, T, Khan, H, Zaccardi, F & Laukkanen, JA 2015, 'Association Between Sauna Bathing and Fatal Cardiovascular and All-Cause Mortality Events', JAMA Internal Medicine, vol. 175, no. 4, pp. 542-548.

The Benefits of Infrared Saunas on your Skin

Infrared saunas work effectively and without causing harm to detoxify and rejuvenate our largest organ, our skin.

The gradual warming heat of the infrared sauna opens our pores and helps us sweat out toxins, creating a natural by-product of softly glowing skin. The natural sweating that occurs in an infrared sauna helps our skin purge the dirt, grime and oil that builds up as part of day-to-day life. Don’t just take our word for it, peer-reviewed research provides evidence that infrared saunas act on the whole body and are indeed beneficial for our skin (Cristiano 2019).

The gentle warming of our skin that occurs in the infrared sauna also improves circulation, and with better blood flow we see clearer, softer and smoother skin.

The impact of stress on our skin is proven (Orion & Wolf 2013) and the gentle stress relief provided by some time alone or with a loved one in an infrared sauna can contribute to healing your skin ailments. The heat produced by infrared saunas (120˚f /48˚c) compared to traditional saunas (150-170˚f/65-75˚c) means the heat is less intense and leaves you feeling energised rather than drained (Fiorella 2017). The soothing infrared sauna experience relieves stress from within to benefit your whole body.

Infrared saunas are a natural, chemical free way to give our skin a cleansing, relaxing treatment and improve blood flow within our whole body. Be in touch to see how we can support you in your infrared sauna journey towards the glowing complexion of your dreams.

Infrared Sauna Repairs, Melbourne, Australia

+61 0499 826 814

allan@customsaunas.com.au

Allan Burns, Custom Saunas Australia

Allan Burns, Custom Saunas Australia


References

Cristiano, L 2019, 'Use of infrared-based devices in aesthetic medicine and for beauty and wellness treatments', Infrared physics & technology, vol. 102, p. 102991.

Fiorella, V 2017, 'OFF DUTY --- Style & Fashion: Heat Advisory --- The buzz about infrared sauna therapies is growing, thanks to claims of detox benefits and stress relief, but do these sessions truly deliver?', The Wall Street journal. Eastern edition, 2017.

Orion, EMD & Wolf, RMD 2013, 'Psychological factors in skin diseases: Stress and skin: Facts and controversies', Clin Dermatol, vol. 31, no. 6, pp. 707-711.

Sleep - Encouraging a deep and restorative sleep with infrared saunas

Infrared saunas calm and relax the body, leading to that often-elusive dream of a deep and restorative sleep. While infrared saunas directly and safely heat the body, rather than the sauna room, they help to avoid the stifling feeling of thick and heavy air in a traditional steam sauna and leave you feeling refreshed and relaxed.

Daily infrared sauna use not only releases toxins and pain from your body and helps still your mind, it also engages the body’s natural hormones through thermoregulation to encourage the body to fall asleep swiftly.

Thermoregulation is the body’s ability to regulate and maintain a healthy temperature. The body’s temperature fluctuates slightly in the evenings to signal to the brain that it is time to start producing melatonin, commonly called the sleep hormone. Having an infrared sauna in the evening safely warms the body to the core, with the resulting natural cool-off at the end of your sauna aiding stimulation of the production of melatonin.

Our bodies continue to cool down overnight, hitting their lowest temperature in the middle of the night, before engaging the hormone cortisol to raise the body temperature to wake up at morning and be energised for the coming day. These hormone rhythms are crucial to the biological processes we need to maintain a healthy and productive life. Use of infrared saunas in the evenings can aid this natural process and along with the benefits of sauna use for pain relief and relaxation, combine to help you sleep swiftly, deeply and well.

Don’t hesitate to be in touch to see how we can support you in your infrared sauna journey to better sleep.

Infrared Sauna Repairs Melbourne, Australia

+61 0499 826 814

allan@customsaunas.com.au

Rendering of one of our custom-made Infrared Saunas.

Rendering of one of our custom-made Infrared Saunas.


Replacing your Ceramic Infrared Sauna Heating Tube

Changing over the Ceramic Infrared Heating tube in you Home Infrared Sauna can be a fairly easy process when you have all the right tools and parts ready to go. In one of our previous Blog Posts HERE we discussed how to test and select the right Ceramic Tube for you sauna, and in this Blog we are going to walk you through changing the tube. The first few steps are repeated from last time, as the process is similar.

Once again it is important to make sure that you have all the tools ready to make the job go smoothly;
o   Philips #2 Screwdriver
o   Small Flat Screwdriver or Small Utility Knife
o   Pliers or small adjustable wrench/ Shifter
o   Digital Multi-meter (Optional)

Before we start make sure that you have the power disconnected from the Sauna, this is critical as I have seen the neutral/common side of the Ceramic Tube switched, while maintaining 240v potential to the other end. The best way to do this is to remove the plug from the wall and leave it resting somewhere you can see it. In the case of a hard-wired unit Isolate the power from a locally positioned Isolator/Disconnect or from the Breaker in the Board. As always safety is the most important thing, Electrical work must always be undertaken by a licensed and competent professional in your local jurisdiction.

Now to remove the cover from the Heater. Using the small flat blade screwdriver or utility knife remove the small timber caps usually covering the screws in the backrest and heater frames. Store these in a small container or other safe place for reuse. Using the #2 Philips screwdriver remove all the screws holding the frames and heater covers to the wall, again setting the screws aside in the small container. Place all the frames and covers somewhere out of the way, preferably outside of the sauna. This should now have exposed the entire ceramic heating tube allowing access for the next step.

Cover removed from over Ceramic Heating Tube

Cover removed from over Ceramic Heating Tube

As we did in the previous Blog it is important to visually inspect the wires and lugs connected to the top and bottom of the heater tube. Occasionally the terminals can corrode and become brittle, severing from the termination point. Remove the threaded ceramic caps off both ends the Ceramic Tubes. If this looks like it is showing signs of corroding give the lugs and wires a stress test by wiggling the cable with a little force. This action should not stress out a healthy terminal but will likely break down one that is on the way out. Before moving on we want to fix this by cleaning up the cable and attaching new lugs.

Once the corrosion has been identified we need to work out how far along the cable that corrosion stretches, and how much length (in cable) we have to play with for re-lugging and reconnecting. The best way is to slowly pull the cable out towards you feeling how flexible is (more flexible is better) making sure you find a good point in the cable that will also reach the bolt on the heating tube. Keeping in mind the cables will either be running down from the top of the panels, between heaters on the wall or down to the under-bench heaters, as you don’t want to lose an end in to the wall by pulling to hard. With the cable at an optimal length you will need to strip off a small amount of the insulation to match the lug, then twist the strands together and crimp on the lug. Only bare lugs with no plastic insulation can be used, as the high temperature will damage any plastic insulation.

With the lugs replaced (where necessary) we can now move on to removing the Tube that is to be replaced (If not already done). Remove the lugged cables from each end of the tube by loosening off the outermost nut on the threaded connection. Being careful to not move the inner nut as much as possible, as this is connected to the internal filament and could cause a weakening. After removing the lugs be sure to prevent them from slipping back inside the wall panels using some method of restraint.

The tubes are usually held in place at one end by means of a sprung wire latched into place mechanically similar to a safety pin. At the other end it will most likely be simply slipped into a snug hole in the sheet metal. Undo the sprung wire, taking note of the mechanism for when you put it back together later. The tube should then simply slide out of the hole in the sheet metal.

Wire clip holding in end of Heater

Wire clip holding in end of Heater

Replacing the tube is the same process in reverse, with the possible need to slightly enlarge the hole in the sheet metal to accommodate a thicker aftermarket Ceramic Tube. I usually do this by putting my closed pliers in the hole till they are sung, then twist them around causing the metal to expand slightly. Do this slowly and in a few stages as it is better to have a tight fit than a loose one.

tightening cap.jpg

Now that the Ceramic Tube is seated and the wire clip is holding it in place reconnect the lugs to both ends of the tube, again trying to only move the outermost nut on the threaded end. Make sure the connection is firm and tight and that no part of the exposed metal ends are anywhere near the metal frame. All the ceramic end-caps should also be re-attached.

Before reinstating the covers and frames it is always a good idea to test the heaters to make sure that they are all working correctly. For this you’ll have to reconnect the sauna and run as you would normally do. Using either a Temperature Gun or the back of your hand (at a distance) check that each heater is beginning to heat up. If they are all working turn the unit back off and reinstate the covers and frames.

Luxo Lammin 3 Person Ceramic Infrared Sauna

Luxo Lammin 3 Person Ceramic Infrared Sauna

Job should now be done, Enjoy!

If you have any further questions or can’t find your exact sized Ceramic Heater Tube in the Store please reach out to us via our Service@customsaunas.com.au email. If you would like to place an order find the Ceramic Tubes here https://infraredsaunarepairs.com.au/new-products/ceramic-heating-tubes

My infrared sauna is not getting hot enough

I hear this phrase a lot, and have experienced it myself – “my infrared sauna is not getting hot enough” – a frustrating situation! There are a couple of reasons this may be occurring:  

Most prefabricated infrared saunas are made with a few things in mind, weight (for shipping and installation) and cost. This can mean that both lightweight and cheap materials are used. As a result, these saunas are not well insulated and will exchange heat with the surrounding environment rapidly. This means the location of your sauna can be one of the biggest factors in its performance. However, there are things that can be done to improve your situation, even if you have your sauna outside:

-          Insulating the Roof
No surprises here, hot air rises, and then it escapes! If you have a typical Home Infrared Sauna you will have a ceiling panel that has two lining layers, one on the interior, usually cedar boards and one on top, usually a thin piece of plywood. Between this is usually an open space, with some cables, lighting and control components. Installing insulation in this cavity can have a significant impact on internal temperatures. To do this simply unscrew the top lining of the ceiling and place some polyester insulation batts in the cavities, being careful to not restrict air flow to the control box, air vent or the back of the lighting. Then replace the ply cover and screw it back on.

-          Sit the sauna on some rubber gym flooring
All materials have different thermal properties absorbing heat at different rates. For example, concrete will absorb heat quickly because it is highly conductive. In practical terms, concrete flooring will draw heat away from you and your sauna. If you have the sauna outside, or in a garage where the concrete temperature is low (cold) the concrete will draw the warmth out of the sauna. A simple solution to this is to buy some rubber similar to a gym floor and place that on the concrete under your sauna.

-          Checking for gaps
Heat escapes wherever it can, especially when there is a greater temperature difference between two areas. Look over your sauna for gaps around the door and between the panels. If you can see through a gap it’s a good idea to try and plug it. If the gaps increase from the top to bottom of the door or panel the sauna might be out of square. Sometimes this imbalance can be fixed by simply pushing the sauna gently at the top to shift the wall. If your sauna has a glass door against a glass opening, or if you have two glass panels intersecting, you will probably have a plastic weather strip. If the weather strip has perished or been lost, you will want to replace it. These are readily available from most bathroom or shower screen suppliers.

-          Covering your sauna with a dust cover or tarpaulin
Dust covers can improve the performance of your sauna by adding a small amount of insulation and slowing down the passage of air through any gaps that might be present. Some manufacturers sell dust covers for their saunas that protect them from the elements when being used outside. If you want to go a step further you can always add a blanket in between the sauna and the dust cover, like those used by moving companies. If you don’t have the manufactured option, or want to pursue a more cost effective route, you can use a tarpaulin or canvas and some rope to wrap around the unit, which will have the same effect.

Dust cover on Clearlight Premier 2 in the snow

Dust cover on Clearlight Premier 2 in the snow

-          Make sure all the heaters are working

As your sauna ages the likelihood of certain components failing increases. It is worthwhile checking regularly to see if all the heating elements are working, as a sauna will continue to function even if many of the heating elements have failed. Using a temperature gun, or simply the back of your hand, hover over each heater for a few seconds as the sauna warms up to check whether they are getting hot. If some of the elements are not radiating the same level of heat as others it is probable that they have failed. For help identifying the type of heaters and a replacement option, feel free to reach out in the comments below, and note that pictures can help and this will assist with the same issues.

-          Installing heaters on empty walls

The design of the sauna is important. Without going into too much detail about how infrared saunas work in this blog, placement of heaters is critical. If you have large sections of glass, or walls that have no heaters facing the user you are certainly not receiving the full benefits. I have a corner sauna with the outwards facing walls all glass. This left my front often feeling cooler than the back of my body and leaving me sweating unevenly. I have since upgraded this sauna to have a heater above the door facing down and towards my chest. The improvement was dramatic. This is notable in the higher end models, like my new SunStream that has full 360º coverage. Being heated from every side evenly allows the user to sweat faster and more completely at a lower temperature . Installing heaters on empty walls is one of the more involved improvements to do by yourself so I will expand on this in a separate blog and video.

Heater mounted to door of SunStream 10 EHS (left) heater mounted above door of Luxo Tavii (right)

Heater mounted to door of SunStream 10 EHS (left) heater mounted above door of Luxo Tavii (right)

Hopefully some of these have been helpful and can be applied to your situation. I will keep updating post as more solutions are found, and if you have any please included them in the comments bellow.

It is also important to note that regardless of how well designed an infrared sauna is it will only reach operating temperatures of between 50-70ºC. Often when people first get into the world of infrared saunas they have some experience with traditional or steam saunas. These operate using a different principal and at different temperatures, often between 70-100ºC and with higher levels of humidity.